Change overall volume level
Changing overall volume level involves using the Amplify, Normalize, or Compressor effects. All three of these methods can increase and decrease overall volume level. However, the type of method(s) that you should use depends on how you want the audio to sound.
| If you want to… | … then… |
|---|---|
|
Amplify audio |
|
Normalize audio |
|
Compress audio |
Note
Audacity is primarily a destructive editor. Destructive editing means that changes applied to the audio permanently change its waveform. For example, if you apply an effect, save your progress, and close the project, you’ll be unable to restore the version of the project that contained the original audio the next time you open it in Audacity. For this reason, you should have two copies of your project: one copy to edit and another to keep as a master copy with unaltered audio in case you want to undo any unwanted permanent changes.
Newer versions of Audacity (3.2.0 and newer) also have non-destructive plug-ins (“realtime effects”) that don’t change the waveform and are reversible. However, this guide currently doesn’t cover how to use these plug-ins.
Note
To increase or decrease an entire track’s volume level relative to all other tracks in the project, adjust the track gain using the Gain slider instead.
Tip
Ideally, you should remove background noise before adjusting a track’s volume. Increasing audio volume will also increase the volume of any background noise in the track.
Amplify audio
Amplifying audio using the Amplify effect allows you to increase and decrease an audio selection’s volume level by a specific decibel value (up to 0 dB). It also allows you to adjust the volume of multiple tracks by an equal amount and maintain the original relative volume difference between them.
Amplification is useful for:
-
Increasing the volume of quiet audio with or without clipping.
-
Increasing or decreasing the volume of multiple tracks by an equal amount and retaining the balance between tracks.
To amplify audio:
-
On the Tools toolbar, click the Selection tool.

-
Select the track(s) or section(s) of audio that you want to amplify.
-
Go to Effect > Amplify.
-
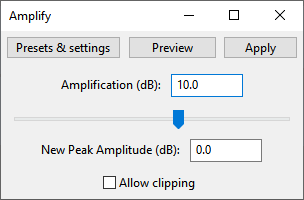
In the dialog box, configure your preferred amplification settings.

Configuration
Amplification (dB)
This setting controls the amount of amplification (measured in decibels or dB) to apply to the audio selection. An amplification of X dB means that all parts of the audio will get amplified equally by X dB. For example, an amplification of 2 dB means that all parts of the audio will get amplified equally by 2 dB.Note: The Amplification (dB) and New Peak Amplitude (dB) values correspond with each other. Changing either of these values will also update the other value. As a result, you can change the amplification by adjusting either of these two values.
Change the amplification using the value box or slider:-
To increase the amplification and volume level, drag the slider to the right.
-
To decrease the amplification and volume level, drag the slider to the left.
Note: By default, Audacity prevents you from increasing the amplification any further once the new peak amplitude reaches 0 dB to prevent audio clipping and distortion. To apply more amplification than what is allowed by default, enable Allow clipping.
New peak amplitude (dB)
This setting controls the audio selection’s maximum amplitude peak (or loudest point). Change the new peak amplitude using the value box.
Tip: You can match volume levels of different tracks and audio selections by monitoring the Playback meter toolbar.
To match volume levels:
1. Play the track or audio selection whose volume you want to match.
2. On the Playback meter toolbar, keep track of the maximum peak level, which is indicated by a blue line.

3. After playback, estimate the maximum peak level’s decibel value.
4. Enter the estimated decibel value in the New Peak Amplitude (dB) value box.
Allow clipping
This setting allows amplitude peaks to exceed 0 dB, which may result in audio clipping and distortion. To increase the amplification beyond the non-clipping range, check this box.
Note
You may need to monitor playback level and configure the settings through trial and error until you get your preferred result. To preview the audio before applying the settings, click Preview.
Tip
To save the amplification settings as a preset for future use, click Presets & settings > Save Preset.
-
-
Click Apply.
Normalize audio
Normalizing audio using the Normalize effect allows you to set an audio selection’s maximum amplitude (or loudest point) to a specific decibel value (up to 0 dB). This increases or decreases the volume level proportionally without changing its dynamic range. It also allows you to match volume levels across multiple tracks to ensure that the audio is around the same volume.
Normalization is useful for:
-
Increasing the volume of quiet audio without clipping.
-
Making multiple tracks that were recorded at different volume levels the same volume.
-
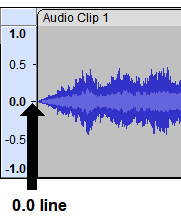
Removing DC offset if the recorded or imported audio isn’t centered at the 0.0 line on the Vertical scale.
Tip
Before mixing or exporting, you should normalize all tracks to match the volume levels in the project.
To normalize audio:
-
On the Tools toolbar, click the Selection tool.

-
Select the track(s) or section(s) of audio that you want to normalize.
-
Go to Effect > Normalize.
-
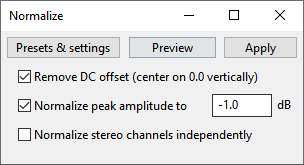
In the dialog box, configure your preferred normalization settings.

Configuration
Remove DC offset (center on 0.0 vertically)
This setting centers the waveform at the 0.0 line on the Vertical scale.

To prevent audio clipping and distortion caused by DC offset, check this box.
Normalize peak amplitude to __ dB
This setting sets a volume limit (measured in decibels or dB) on the loudest part of the audio selection. Normalizing the peak amplitude to X dB means that the volume will be increased until the loudest part of the audio reaches X dB. For example, normalizing the peak amplitude to -1 dB means that the loudest part of the audio won’t exceed -1 dB.
To normalize the peak amplitude to a specific decibel level, check this box and enter the decibel level in the value box.
Normalize stereo channels independently
This setting adjusts the amplitude separately on each channel and makes the audio on both channels sound equal. To normalize a stereo track that contains audio that has been recorded at different volume levels, check this box.
Note
You may need to monitor playback level and configure the settings through trial and error until you get your preferred result. To preview the audio before applying the settings, click Preview.
Tip
To save the normalization settings as a preset for future use, click Presets & settings > Save Preset.
-
Click Apply.
Compress audio
Compressing audio using the Compressor effect allows you to reduce an audio selection’s dynamic range to make loud sections of audio quieter and quiet sections of audio louder. It also allows you to create a more uniform sound throughout a track.
Compression is useful for:
-
Decreasing the volume of loud audio.
-
Evening out a track’s volume levels to make both of its quiet and loud sections sound clearer without compromising vocal quality.
To compress audio:
-
On the Tools toolbar, click the Selection tool.

-
Select the track(s) or section(s) of audio that you want to compress.
-
Go to Effect > Compressor.
-
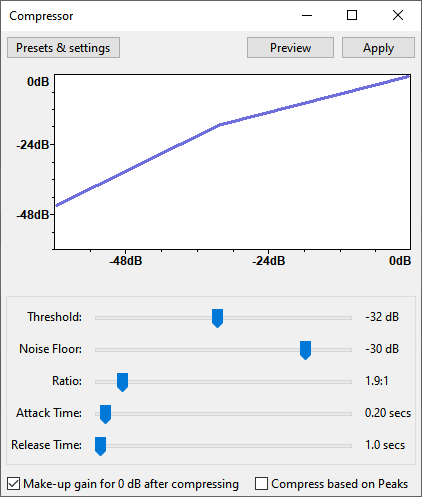
In the dialog box, configure your preferred compression settings.

The dialog box contains a line graph that shows how the compressor will change the audio’s dynamic range. The horizontal axis shows the input dB level, while the vertical axis shows the output dB level. The graph changes as you adjust the Threshold and Ratio sliders.
Configuration
Threshold
This setting sets the decibel level above which audio gets compressed. It determines how loud the audio must be before compression begins. A threshold of X dB means that audio that exceeds X dB will get compressed. For example, a threshold of -15 dB means that any part of the audio that gets louder than -15 dB will get compressed.Change the threshold using the slider:
-
To increase the threshold and compress less audio, drag the slider to the right.
-
To decrease the threshold and compress more audio, drag the slider to the left.
Noise floor
This setting sets the decibel level below which audio is considered background noise and won’t get amplified after compression. It prevents the compressor from increasing background noise levels during silent pauses in the audio signal. A noise floor of X dB means that audio below X dB will be considered background noise and won’t get amplified. For example, a noise floor of -40 dB means that any part of the audio that’s quieter than -40 dB will be considered background noise and won’t get amplified.Change the noise floor using the slider:
-
To increase the noise floor and decrease the volume level of background noise during pauses, drag the slider to the right.
-
To decrease the noise floor and increase the volume level of background noise during pauses, drag the slider to the left.
Ratio
This setting controls the relative amount of compression to apply to the audio selection compared to the specified threshold. A ratio of X:Y means that audio that exceeds the threshold by X dB will be decreased by Y dB. For example, a ratio of 4:2 means that any part of the audio that gets louder than the threshold by 4 dB will get decreased by 2 dB.Change the ratio using the slider:
-
To increase the ratio and compress more loud parts of audio, drag the slider to the right.
-
To decrease the ratio and compress fewer loud parts of audio, drag the slider to the left.
Attack time
This setting controls how fast the compressor begins compressing a volume change when it detects that the audio signal has exceeded the threshold.Change the attack time using the slider:
-
To increase the attack time and start compression quicker, drag the slider to the right.
-
To decrease the attack time and start compression slower, drag the slider to the left.
Release time
This setting controls how fast the compressor stops compressing a volume change when it detects that the audio signal no longer exceeds the threshold.Change the release time using the slider:
-
To increase the release time and stop compression slower, drag the slider to the right.
-
To decrease the release time and stop compression quicker, drag the slider to the left.
Make-up gain for 0 dB after compressing
This setting compensates for the decrease in peak volume during compression and amplifies the audio to a peak level of 0 dB. To make the quieter parts of audio louder and increase the overall volume level without clipping, check this box.
Compress based on peaks
This setting sets the threshold and gain adjustments using the waveform’s peak values instead of the average value of its highest and lowest points. To increase the volume of all sounds and amplify the louder sounds that exceed the threshold less than the quieter sounds below the threshold, check this box.Note
You may need to monitor playback level and configure the settings through trial and error until you get your preferred result. To preview the audio before applying the settings, click Preview.
Tip
To save the compression settings as a preset for future use, click Presets & settings > Save Preset.
-
-
Click Apply.