Change tempo, speed, and pitch
Changing tempo, speed, and pitch involves using a time track or the Change tempo, Change speed, or Change pitch effects. The type of method(s) that you should use depends on how you want the audio to sound.
| If you want to… | … then… |
|---|---|
|
Change overall tempo |
|
Change overall speed |
|
Change overall pitch |
|
Adjust speed and pitch changes |
Note
Audacity is primarily a destructive editor. Destructive editing means that changes applied to the audio permanently change its waveform. For example, if you apply an effect, save your progress, and close the project, you’ll be unable to restore the version of the project that contained the original audio the next time you open it in Audacity. For this reason, you should have two copies of your project: one copy to edit and another to keep as a master copy with unaltered audio in case you want to undo any unwanted permanent changes.
Newer versions of Audacity (3.2.0 and newer) also have non-destructive plug-ins (“realtime effects”) that don’t change the waveform and are reversible. However, this guide currently doesn’t cover how to use these plug-ins.
Change overall tempo
Changing overall tempo using the Change tempo effect allows you to increase and decrease audio speed without changing pitch. This is useful for slowing down fast audio to make the individual elements easier to hear while keeping it in the same key.
To change overall tempo:
-
On the Tools toolbar, click the Selection tool.

-
Select the track(s) or section(s) of audio where you want to change the tempo.
-
Go to Effect > Change Tempo.
-
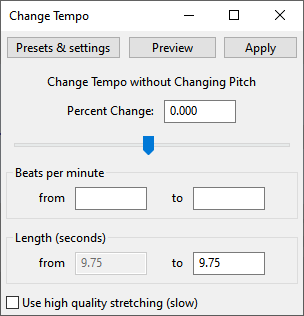
In the dialog box, configure your preferred tempo settings.

Configuration
Percent change
This setting controls the audio selection’s tempo using a specific percentage.Change the percent change using the value box or slider:
-
To increase the percent change and audio tempo, drag the slider to the right.
-
To decrease the percent change and audio tempo, drag the slider to the left.
Note: The Percent Change, Beats per minute “to”, and Length (seconds) “to” values correspond with each other. Changing one of these values will also update the other two values. As a result, you can change the tempo and speed by adjusting any of these three values.
Beats per minute
This setting controls the number of beats present in an audio selection in one minute.Change the beats per minute using the value boxes:
-
If you know the audio selection’s original beats per minute, enter the number in the “from” value box.
-
If you know the number of beats per minute you want the audio selection to have, enter the number in the “to” value box.
Length (seconds)
This setting controls the audio selection’s length.Change the length using the value box:
-
The “from” value box indicates the current length and can’t be changed.
-
If you know how long you want the audio selection to be, enter the new length in the “to” value box.
Use high quality stretching (slow)
This setting slows down the stretching process but ensures that it doesn’t drastically decrease the quality of the audio selection. To maintain higher audio quality, check this box.Note: Applying large tempo changes may result in distorted audio. Enabling high quality stretching can lessen the distortion but may not completely remove it.
Note
You may need to configure the settings through trial and error until you get your preferred result. To preview the audio before applying the settings, click Preview.
Tip
To save the tempo settings as a preset for future use, click Presets & settings > Save Preset.
-
-
Click Apply.
Change overall speed
Changing overall speed using the Change speed effect allows you to increase and decrease audio speed as well as tempo and pitch. This is useful for creating a slow-mo or fast-forward vocal/music effect.
To change overall speed:
-
On the Tools toolbar, click the Selection tool.

-
Select the track(s) or section(s) of audio where you want to change the speed.
-
Go to Effect > Change Speed.
-
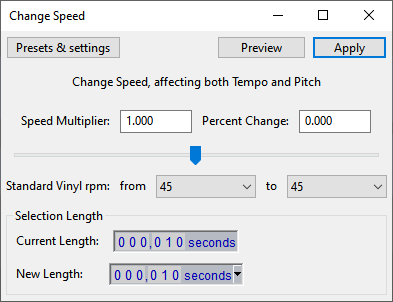
In the dialog box, configure your preferred speed settings.

Configuration
Speed multiplier
This setting controls the audio selection’s speed using a specific multiplier factor.Change the speed multiplier using the value box or slider:
-
To increase the speed multiplier and audio speed, drag the slider to the right.
-
To decrease the speed multiplier and audio speed, drag the slider to the left.
Note: The Speed Multiplier, Percent Change, Standard Vinyl rpm “to”, and New Length values correspond with each other. Changing one of these values will also update the other three values. As a result, you can change the speed by adjusting any of these four values.
Percent change
This setting controls the audio selection’s speed using a specific percentage.Change the percent change using the value box or slider:
-
To increase the percent change and audio speed, drag the slider to the right.
-
To decrease the percent change and audio speed, drag the slider to the left.
Standard vinyl rpm
This setting corrects the speed of a vinyl record that was played back and recorded at the wrong speed:-
If you know the audio selection’s original standard vinyl rpm, select the value in the “from” dropdown menu.
-
If you know the standard vinyl rpm that you want the audio selection to have, select the value in the “to” dropdown menu.
Selection length
This setting indicates the audio selection’s length:-
Current Length indicates the current length of the audio selection before applying the Change speed effect. This value can’t be changed.
-
New Length indicates the new length of the audio selection after applying the Change speed effect. If you know how long you want the audio selection to be, enter the new length using the value box or dropdown menu.
Note
You may need to configure the settings through trial and error until you get your preferred result. To preview the audio before applying the settings, click Preview.
Tip
To save the speed settings as a preset for future use, click Presets & settings > Save Preset.
-
-
Click Apply.
Change overall pitch
Changing overall pitch using the Change pitch effect allows you to increase and decrease audio pitch without changing tempo. This is useful for fixing audio that’s off-key or creating a high-pitched chipmunk voice effect or low-pitched monster voice effect.
To change overall pitch:
-
On the Tools toolbar, click the Selection tool.

-
Select the track(s) or section(s) of audio where you want to change the pitch.
-
Go to Effect > Change Pitch.
-
In the dialog box, configure your preferred pitch settings.

Configuration
Pitch
This setting controls the audio selection’s pitch using a specific musical note and octave.Change the pitch using the value boxes:
-
If you know the audio selection’s original key, using the “from” controls, select the musical note in the dropdown menu and enter the octave in the value box.
-
If you know the new key that you want the audio selection to be, using the “to” controls, select the musical note in the dropdown menu and enter the octave in the value box.
Note: The Pitch “to”, Semitones (half-steps), Frequency “to”, and Percent Change values correspond with each other. Changing one of these values will also update the other three values. As a result, you can change the speed by adjusting any of these four values.
Semitones (half-steps)
This setting controls the audio selection’s pitch using a specific number of semitones. Change the semitone number using the value box.
Frequency
This setting controls the audio selection’s pitch using a specific frequency (measured in hertz or Hz).Change the frequency using the value box or slider:
-
If you know the audio selection’s original frequency, enter the number in the “from” value box.
-
If you know the frequency that you want the audio selection to be, enter the number in the “to” value box.
-
To increase the frequency and pitch, drag the slider to the right.
-
To decrease the frequency and pitch, drag the slider to the left.
Percent change
This setting controls the audio selection’s pitch using a specific percentage.Change the percent change using the value box or slider:
-
To increase the percent change and audio pitch, drag the slider to the right.
-
To decrease the percent change and audio pitch, drag the slider to the left.
Use high quality stretching (slow)
This setting slows down the stretching process but ensures that it doesn’t drastically decrease the quality of the audio selection. To maintain higher audio quality, check this box.Note: Applying large pitch changes may result in distorted audio. Enabling high quality stretching can lessen the distortion but may not completely remove it.
Note
You may need to configure the settings through trial and error until you get your preferred result. To preview the audio before applying the settings, click Preview.
Tip
To save the pitch settings as a preset for future use, click Presets & settings > Save Preset.
-
-
Click Apply.
Adjust speed and pitch changes
Adjusting speed and pitch changes using a time track allows you to modify a time warp line, which gives you finer control of audio speed and pitch. This is useful for blending abrupt speed and pitch differences in specific parts of a project.
Note
Changing the speed and pitch using a time track will alter all overlapping tracks in the affected region on the Timeline. If you want to change the speed or pitch of a specific track, use the Change speed or Change pitch effect instead.
To adjust speed and pitch changes:
-
Go to Tracks > Add New > Time Track.
Note
You can add only one time track to a project.
-
On the Track control panel, click the Track dropdown menu.

-
Select Range.
-
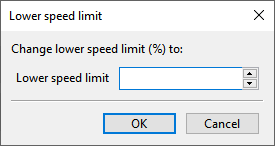
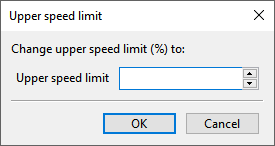
In the dialog boxes, adjust the audio speed limits:
-
Enter the lower speed limit (minimum speed change allowed).

-
Click OK.
-
Enter the upper speed limit (maximum speed change allowed).

-
Click OK.
-
-
Click and place a control point on the part of the time warp line that matches up with the part of the waveform(s) where you want to adjust the speed and pitch.

Note
The 100 point on the time track’s Vertical scale indicates the normal audio speed (100%). Adjusting the time warp line above 100 increases the speed and pitch, and adjusting it below 100 decreases the speed and pitch.
Tip
To move a control point left or right, drag it along the track. To delete a control point, drag it off the track.
-
Drag the control point up or down to change the speed and pitch:
-
To increase the speed and pitch, drag the control point up.
-
To decrease the speed and pitch, drag the control point down.
-
-
Repeat steps 5 and 6 to adjust the speed and pitch of other sections of audio.