Gradually change volume level
Gradually changing volume level involves using the Envelope tool or Fade in, Fade out, Crossfade tracks, or Crossfade clips effects. All five of these methods can gradually increase or decrease volume level. However, the type of method(s) that you should use depends on how you want the audio to sound.
| If you want to… | … then… |
|---|---|
|
Fade in audio |
|
Fade out audio |
|
Crossfade tracks |
|
Crossfade clips |
|
Adjust volume changes |
Note
Audacity is primarily a destructive editor. Destructive editing means that changes applied to the audio permanently change its waveform. For example, if you apply an effect, save your progress, and close the project, you’ll be unable to restore the version of the project that contained the original audio the next time you open it in Audacity. For this reason, you should have two copies of your project: one copy to edit and another to keep as a master copy with unaltered audio in case you want to undo any unwanted permanent changes.
Newer versions of Audacity (3.2.0 and newer) also have non-destructive plug-ins (“realtime effects”) that don’t change the waveform and are reversible. However, this guide currently doesn’t cover how to use these plug-ins.
Fade in audio
Fading in audio using the Fade in effect allows you to gradually increase the volume of specific sections of audio. This is useful for making the introductions of songs and podcast segments sound more natural and less abrupt.
To fade in audio:
-
On the Tools toolbar, click the Selection tool.

-
Select the track(s) or section(s) of audio that you want to fade in.
-
Go to Effect > Fade In.
Tip
If the selected audio doesn’t completely fade in, delete the tail-end of silent audio in the selection before applying the effect.
Tip
To control and adjust the fade effect further, use the Envelope tool to smoothen the volume.
Fade out audio
Fading out audio using the Fade out effect allows you to gradually decrease the volume of specific sections of audio. This is useful for making the endings of songs and podcast segments sound more natural and less abrupt.
To fade out audio:
-
On the Tools toolbar, click the Selection tool.

-
Select the track(s) or section(s) of audio that you want to fade out.
-
Go to Effect > Fade Out.
Tip
If the selected audio doesn’t completely fade out, delete the tail-end of silent audio in the selection before applying the effect.
Tip
To control and adjust the fade effect further, use the Envelope tool to smoothen the volume.
Crossfade tracks
Crossfading tracks using the Crossfade tracks effect allows you to create a seamless transition between one track and the next without adding any jarring audio changes. This is useful for merging different songs in a song compilation and making podcast segment introductions and endings sound more natural and less abrupt.
To crossfade tracks:
-
On the Tools toolbar, click the Selection tool.

-
Trim any unwanted sections of audio.
-
Move the tracks’ clips to the desired audio positions.
-
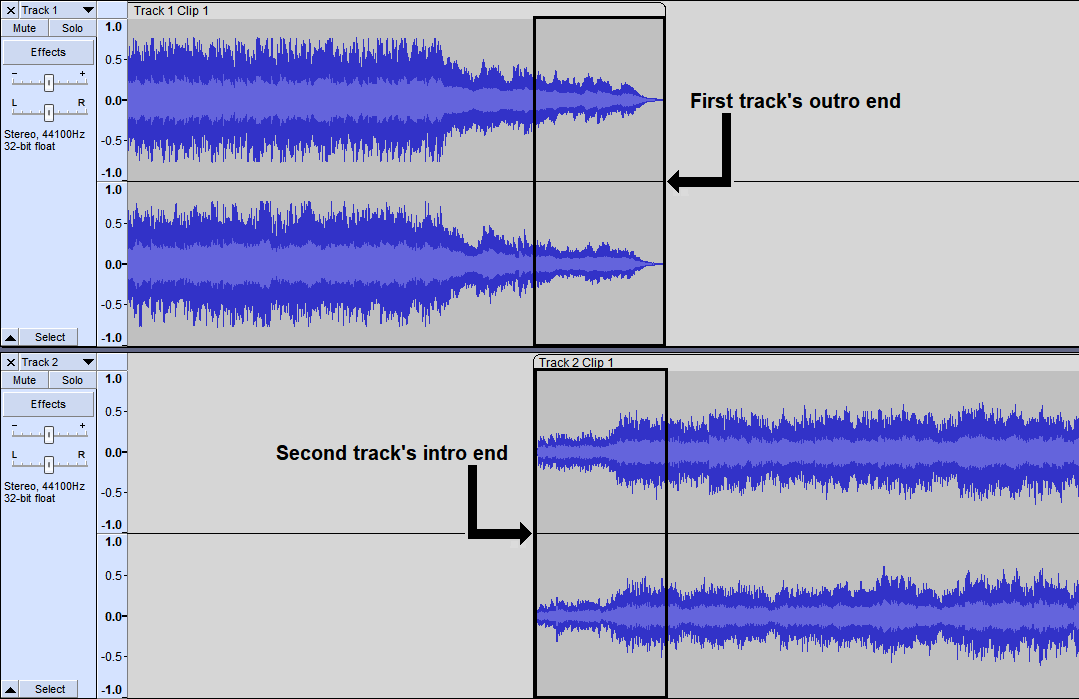
Move the clip that’s inside the second track and overlap a portion of its intro end with the outro end of the clip that’s inside the first track.

Note
Overlapping audio will play at the same time.
-
Select the overlapping sections of audio in both of the tracks.
Note
The crossfade length depends on the selection length. The beginning of the selection is where the crossfade will begin, and the end of the selection is where the crossfade will end.
-
Go to Effect > Crossfade Tracks.
-
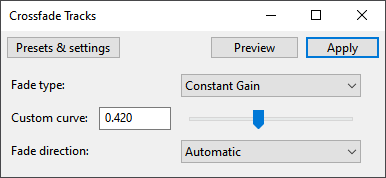
In the dialog box, configure your preferred crossfade settings.

Configuration
Fade type
This setting adjusts how an audio selection fades in or fades out:
-
Constant Gain fades out audio in the first track and fades in audio in the second track using a linear fade. It prevents the crossfade from clipping (as long as the original audio doesn’t clip) but may drop the overall volume slightly as the audio fades.
-
Constant Power 1 works like Constant Gain but prevents the overall volume from dropping and may boost the peak volume level as the audio fades.
-
Constant Power 2 works like Constant Power 1 but fades audio quicker and may make the crossfade sound more abrupt.
-
Custom Curve enables the Custom curve option, which allows you to adjust the fade manually.
Custom curve
This setting adjusts the fade’s curvature and allows for more control of the fade effect. To enable this option, select Custom Curve in the Fade Type dropdown menu.
Change the custom curve using the value box or slider:
-
To make both tracks more prominent during the crossfade (fade out the first track and fade in the second track less gradually), drag the slider to the right.
-
To make both tracks less prominent during the crossfade (fade out the first track and fade in the second track more gradually), drag the slider to the left.
Fade direction
This setting controls whether the intro or outro end of a track fades in or fades out:
-
Automatic automatically detects whether to fade in or fade out a track. It generally produces the correct result.
-
Alternating Out / In fades out the first track and fades in the second track. If there are any subsequent tracks selected, the fade direction will alternate between fading out and fading in the tracks.
-
Alternating In / Out fades in the first track and fades out the second track. If there are any subsequent tracks selected, the fade direction will alternate between fading in and fading out the tracks.
Note
You may need to configure the settings through trial and error until you get your preferred result. To preview the audio before applying the settings, click Preview.
Tip
To save the crossfade settings as a preset for future use, click Presets & settings > Save Preset.
Tip
To control and adjust the fade effect further, use the Envelope tool to smoothen the volume.
-
-
Click Apply.
Crossfade clips
Crossfading clips using the Crossfade clips effect allows you to create a seamless transition between one clip and the next. This is useful for joining different songs smoothly without adding any jarring audio changes or silence and making introductions and endings of podcast segments sound more natural and less abrupt.
To crossfade clips:
-
On the Tools toolbar, click the Selection tool.

-
Trim any unwanted sections of audio.
-
Move the clips so that they are next to each other at the desired audio positions.
-
Select a section of audio that contains the first clip’s outro end and the second clip’s intro end.

Note
The crossfade length depends on the selection length. The beginning of the selection is where the crossfade will begin, and the end of the selection is where the crossfade will end.
Tip
To control and adjust the fade effect further, use the Envelope tool to smoothen the volume.
-
Go to Effect > Crossfade Clips.
Adjust volume changes
Adjusting volume changes using the Envelope tool allows you to edit a track’s waveform and smoothen the volume levels of specific sections of audio. This is useful for blending different audio elements together, such as adjusting voiceover and background music volume at certain points in a track.
Note
The Envelope tool can’t fade audio completely. If you need to completely fade audio, use the Fade in or Fade out effect instead.
To adjust volume changes:
-
On the Tools toolbar, click the Envelope tool.

-
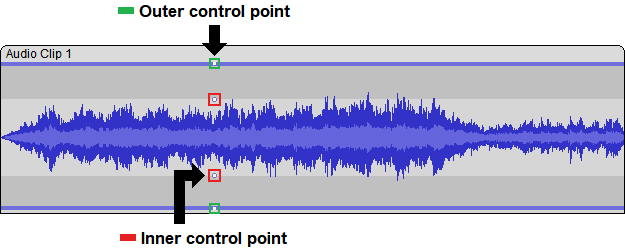
Click and place a control point on the part of the track where you want to adjust the volume level:

-
To move a control point left or right, drag it along the track.
-
To delete a control point, drag it off the track.
-
-
Drag the outer or inner control point up or down to change the volume level:

-
To increase the volume level, drag the control point up.
-
To decrease the volume level, drag the control point down.
Tip
Dragging an outer control point prevents you from dragging it outside the track’s original volume envelope and distorting the audio. Dragging an inner control point has the same effect as dragging an outer control point and also allows you to amplify quiet audio beyond the track’s original volume envelope.
-
-
Repeat steps 2 and 3 to adjust the volume levels of other sections of audio.