Remove background noise
Removing background noise using the Noise reduction effect allows you to reduce ambient sound that was picked up during recording and make audio sound cleaner and clearer.
Tip
Ideally, you should remove background noise before adjusting a track’s volume. Increasing audio volume will also increase the volume of any background noise in the track.
To remove background noise:
-
On the Tools toolbar, click the Selection tool.

-
Select a section of audio that contains a few seconds of background noise without any voices or instrumentals to use as a baseline for noise reduction.
Note
On the waveform, background noise will appear as an almost straight line with small peaks and valleys as opposed to a completely straight line, which indicates complete silence.
Tip
One way of getting a good amount of background noise is to record 10 to 20 seconds of room tone. This involves recording your recording environment in complete silence and deleting the audio after getting its noise profile.
-
Go to Effect > Noise Reduction.
-
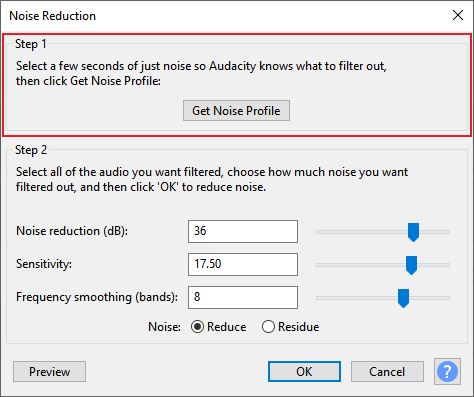
In the dialog box, under Step 1, click Get Noise Profile.

Note
After getting the noise profile, Audacity will create a noise profile based on the audio selection and close the dialog box automatically.
-
Select the section of audio that contains background noise that you want to remove.
-
Go to Effect > Noise Reduction.
-
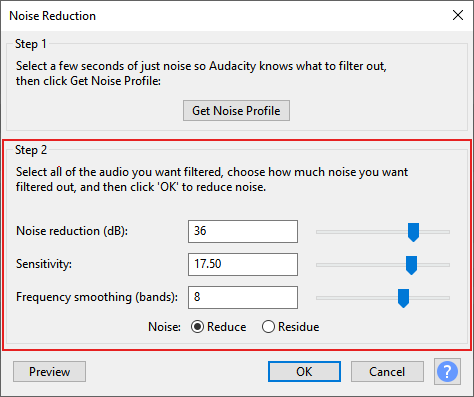
In the dialog box, under Step 2, configure your preferred noise reduction settings.

Configuration
Noise reduction (dB)
This setting controls the amount of noise reduction (measured in decibels or dB) to apply to the audio selection. A noise reduction of X dB means that the volume of the noise will get reduced by X dB. For example, a noise reduction of 25 dB means that the volume of the noise will get reduced by 25 dB.
Change the noise reduction using the value box or slider:
-
To remove more noise, drag the slider to the right.
-
To remove less noise, drag the slider to the left.
Note: Try to keep the Noise reduction (dB) value as low as possible to remove enough noise and avoid compromising audio quality. A value that's too low may still result in unwanted noise, and a value that's too high may distort the audio that you want to keep.
Tip: You can use the noise level as a reference point when adjusting the Noise Reduction (dB) value.
To estimate the noise level:
1. Play a section of audio that contains a few seconds of background noise without any voices or instrumentals.
2. On the Playback meter toolbar, keep track of the maximum peak level, which is indicated by a blue line.

3. After playback, estimate the maximum peak level’s decibel value.Sensitivity
This setting controls how much of the audio to consider as noise.
Change the sensitivity using the value box or slider:
-
To increase the range of audio to treat as noise, drag the slider to the right.
-
To decrease the range of audio to treat as noise, drag the slider to the left.
Note: Try to keep the Sensitivity value as low as possible to remove enough noise but not too low that the audio quality gets compromised. A value that's too low may result in distortion or artifacts, and a value that's too high may remove audio that you want to keep.
Frequency smoothing (bands)
This setting controls the spread of noise reduction into adjacent frequency bands.
Change the frequency smoothing using the value box or slider:
-
To increase the spread of noise reduction and smooth out more distortion or artifacts potentially caused by increasing the sensitivity, drag the slider to the right.
-
To decrease the spread of noise reduction and smooth out less distortion or artifacts potentially caused by increasing the sensitivity, drag the slider to the left.
Tip: For best results, keep the Frequency smoothing (bands) value lower when editing a song and higher when editing a voice recording.
Noise
This setting indicates which type of audio to remove:
-
To remove background noise, select Reduce.
-
To remove all other audio that’s not background noise, select Residue.
Tip: Selecting Residue allows you to see what Audacity identifies as background noise and will subsequently remove after selecting Reduce.
Note
You may need to configure the settings through trial and error until you get your preferred result. To preview the audio before applying the settings, click Preview.
-
-
Click OK.