Change recording settings
Changing recording settings involves configuring your preferences for recording audio.
Select the project sample rate
Selecting the project sample rate allows you to choose the number of audio samples taken per second (measured in hertz or Hz) to create a digital audio signal. This determines the project’s audio quality and file size.
To select the project sample rate:
-
Go to Edit > Preferences.
-
In the dialog box’s left sidebar, select Audio Settings.
-
Under Quality, select the Project Sample Rate using the dropdown menu.
Note
The higher the sample rate, the higher the audio quality and file size. By default, the project sample rate is set to 44100 Hz, which is standard for a typical music CD and considered very good audio quality. Increasing the sample rate above 44100 Hz is unlikely to result in any noticeable audible difference.
-
Click OK.
Select the project sample format (bit depth)
Selecting the project sample format or bit depth allows you to choose the number of bits contained in each audio sample. This determines the project’s dynamic range and file size.
To select the project sample format:
-
Go to Edit > Preferences.
-
In the dialog box’s left sidebar, select Audio Settings.
-
Under Quality, select the Default Sample Format using the dropdown menu.
Note
The higher the bit depth, the higher the dynamic range and file size. By default, the bit depth is set to 32-bit float, which is considered good for audio editing.
Tip
Unless having a small file size is important, you should select the highest bit depth possible when editing audio to get the best dynamic range. After editing, you can select a lower bit depth to decrease the file size.
-
Click OK.
Select a recording device
Selecting a recording device allows you to choose your preferred microphone for recording audio.
To select a recording device:
-
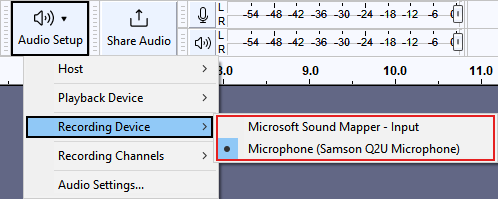
On the Audio setup toolbar, click the Audio setup button > Recording Device.
-
Select your preferred recording device.

Select recording channel type
Selecting recording channel type allows you to choose whether to record audio in mono (one channel) or stereo (two channels).
To select recording channel type:
-
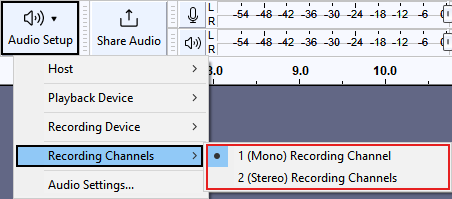
On the Audio setup toolbar, click the Audio setup button > Recording Channels.
-
Select your preferred recording channel:
-
To record in mono, select 1 (Mono) Recording Channel.
-
To record in stereo, select 2 (Stereo) Recording Channels.

Note
If you're unsure whether to record in mono or stereo, consider the advantages and disadvantages of both before selecting a recording channel type.
-
Change recording level
Changing the recording level allows you to increase and decrease the input signal volume of the entire project. This is useful for preventing the recorded audio from getting too loud and clipping.
To change recording level:
-
On the Recording meter toolbar, drag the slider:

-
To increase the recording level, drag the slider to the right.
-
To decrease the recording level, drag the slider to the left.
-
Play other tracks while recording
Playing other tracks while recording involves starting audio playback when you click Record in the Transport toolbar.
To play other tracks while recording:
-
Go to Edit > Preferences.
-
In the dialog box’s left sidebar, select Recording.
-
Under Options, check Play other tracks while recording (overdub).
Note
If overdub is enabled, recording stops when the Record cursor reaches the end of the selection region on the Timeline. To prevent this, uncheck Play other tracks while recording (overdub).
Tip
To select which tracks will play during recording, click the Mute or Solo button on the Track control panel(s).
To stop playing other tracks while recording:
-
Go to Edit > Preferences.
-
In the dialog box’s left sidebar, select Recording.
-
Under Options, uncheck Play other tracks while recording (overdub).
Create a new track when recording
Creating a new track when recording involves recording audio in a new track each time you click Record in the Transport toolbar.
To create a new track when recording:
-
Go to Edit > Preferences.
-
In the dialog box’s left sidebar, select Recording.
-
Under Options, check Record on a new track.
To stop creating a new track when recording:
-
Go to Edit > Preferences.
-
In the dialog box’s left sidebar, select Recording.
-
Under Options, uncheck Record on a new track.
Listen while recording
Listening while recording involves hearing input audio, such as your voice, as you record audio.
Note
When listening while recording, you’ll likely hear latency. Latency is mainly affected by hardware and can’t be completely removed. However, you can reduce latency by configuring your hardware and software settings.
Note
Listening while recording requires enabling software playthrough. If you’re recording audio playing on a computer, leave Software playthrough of input unchecked and disabled to prevent creating feedback echoes.
To listen while recording:
-
Go to Edit > Preferences.
-
In the dialog box’s left sidebar, select Recording.
-
Under Options, check Software playthrough of input.
-
Click OK.
To stop listening while recording:
-
Go to Edit > Preferences.
-
In the dialog box’s left sidebar, select Recording.
-
Under Options, uncheck Software playthrough of input.
-
Click OK.