Monitor audio
Monitoring audio involves checking the recording and playback levels to ensure that the audio isn’t too loud or too quiet. It also involves configuring your recording settings accordingly to save time from not having to rerecord audio due to clipping or distortion.
Tip
Ideally, you should do a quick test recording and monitor the audio before actually recording to ensure that there are no problems with the volume.
Monitor recording level
Monitoring recording level using the Recording meter toolbar involves checking the input signal volume and adjusting the recording level. This is useful for seeing whether you need to increase or decrease the recording level before recording.
To monitor recording level:
-
On the Recording meter toolbar, click the Microphone button > Start Monitoring.

-
Speak or play the instrument into the microphone at the same volume level you plan on speaking or playing when recording.
-
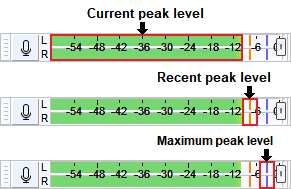
Watch the Recording meter while speaking or playing and keep track of the input signal’s current peak level (green bar), recent peak level (orange line), and maximum peak level (blue line).

Note
If you’re recording in stereo, the gradient meter bars will move and change independently in separate left (L) and right (R) channels in the Recording meter.
Ideally, the input signal should be somewhere between -12 dB and -6 dB. To prevent creating potential clipping or distortion, don’t let the input signal exceed -3 dB or reach the red area in the far right of the meter. Clipping occurs when the input signal exceeds 0 dB.

Tip
To expand the Recording meter toolbar and see a larger scale:
1. Drag the toolbar grabber and move the toolbar into its own free-floating panel.

2. Drag the bottom-left corner vertically or horizontally.

To reset the toolbar to its original position in the project window, go to View > Toolbars > Reset Toolbars. -
If the input signal is too loud or too quiet, drag the slider to your preferred recording level or adjust the input controls on the microphone and/or other recording device.

Note
If the input signal is too quiet, you can always increase the volume by increasing the gain or amplifying the audio. However, if the input signal is too loud, you’ll be unable to fix the audio clipping or distortion after recording.
-
Repeat steps 2 to 4 until the input signal volume isn’t too loud or too quiet.
To stop monitoring recording level:
-
On the Recording meter toolbar, click the Microphone button > Stop Monitoring.

Monitor playback level
Monitoring playback level using the Playback meter toolbar involves checking the output signal volume and adjusting the playback level. This is useful for seeing whether you need to increase or decrease the audio volume after recording.
To monitor playback level:
-
On the Tools toolbar, click the Selection tool.

-
Select the section of audio that you want to monitor.
-
On the Transport toolbar, click Play.

-
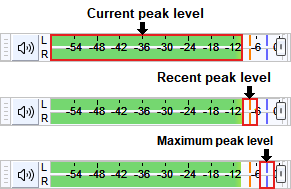
Watch the Playback meter and keep track of the output signal’s current peak level (green bar), recent peak level (orange line), and maximum peak level (blue line).

Note
If you're playing a track that was recorded in stereo, the gradient meter bars will move and change independently in separate left (L) and right (R) channels in the Playback meter.
Ideally, the output signal should be somewhere between -12 dB and -6 dB. To prevent hearing potential clipping or distortion, don’t let the output signal exceed -3 dB or reach the red area in the far right of the meter.

Tip
To expand the Playback meter toolbar and see a larger scale:
1. Drag the toolbar grabber and move the toolbar into its own free-floating panel.

2. Drag the bottom-left corner vertically or horizontally.

To reset the toolbar to its original position in the project window, go to View > Toolbars > Reset Toolbars. -
If the output signal is too loud or too quiet, change the audio volume by adjusting the gain or using the Amplify, Normalize, or Compressor effect.
Note
Adjusting the Playback level slider only changes the project’s playback volume in Audacity. It won’t change any actual waveform data or affect an exported project’s volume level.
-
Repeat steps 3 to 5 until the output signal volume isn’t too loud or too quiet.