Record audio
Recording audio involves recording voiceover, vocals, or instrumentals for your project using the currently selected input device.
Note
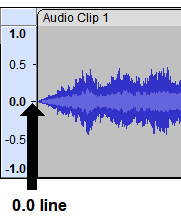
Before recording, ensure that you have configured your preferred recording and playback settings. After recording, if the recorded audio isn’t centered at the 0.0 line on the Vertical scale, normalize the track to remove the DC offset before editing and applying effects. DC offset can result in clipping, distortion, and popping sounds.

Tip
After clicking record, wait about 10 seconds before speaking, singing, or playing into the microphone. The silence serves as a buffer and a way of getting room tone, which you can use as a baseline for noise reduction. You can delete this part of the track after recording and removing background noise.
Record audio in a blank project
To record audio in a blank project:
-
On the Transport toolbar, click Record.

Shortcut
Press R .
-
Speak, sing, or play the instrument into the microphone.
-
Once you finish recording, click Stop.

Record audio in the same track
Recording audio in the same track is useful for recordings that don’t require extensive editing or moving, such as a speech or presentation monologue.
To record audio in the same track:
-
Press and hold Shift .
-
On the Transport toolbar, click Record.

Shortcut
Press Shift + R .
-
Speak, sing, or play the instrument into the microphone.
-
Once you finish recording, click Stop.

Record audio in a new track
Recording audio in a new track is useful for recordings that require editing or moving different sections individually, such as a podcast or multitrack mix.
To record audio in a new track:
-
Choose where you want to start recording on the Timeline:
-
To start recording at the beginning of the Timeline, on the Transport toolbar, click Skip to Start.

-
To start recording at the end of the Timeline, on the Transport toolbar, click Skip to End.

-
To record elsewhere on the Timeline, click the part of the current track where you want to begin recording the new track.
-
-
Create a new track:
- A new track will be created automatically once you begin recording.
- Go to Tracks > Add New > Mono Track or Stereo Track.
-
On the Transport toolbar, click Record.

-
Speak, sing, or play the instrument into the microphone.
-
Once you finish recording, click Stop.

Record two tracks simultaneously
Recording two tracks simultaneously is useful for recording audio from two sources, such as separate mics for different participants in an interview or vocals and instrumentals in a song.
To do this in Audacity, you must record the two tracks as a single stereo track and split them into two separate mono tracks. This method allows you to apply effects and adjust each source’s pan and gain separately.
Note
Recording audio from multiple sources requires using an audio interface or mixer with enough input jacks for the microphones.
First, record the two tracks as a single stereo track:
-
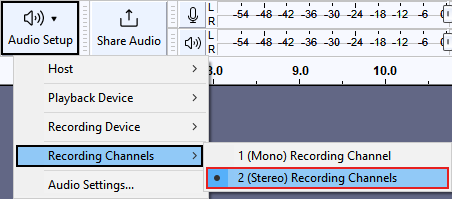
On the Audio setup toolbar, click Audio Setup > Recording Channels > 2 (Stereo) Recording Channels.

-
On the Transport toolbar, click Record.

-
Speak, sing, or play the instrument into the microphones.
-
Once you finish recording, click Stop.

Second, split the stereo track into two separate mono tracks:
-
On the Track control panel, click the Track dropdown menu.

-
Select Split Stereo Track.
Third, adjust the tracks’ pan and gain:
-
On the first track’s Track control panel, drag the Pan slider to the center so that the sound coming out of the left and right headphones or speakers is balanced.

-
Drag the Gain slider to your preferred volume level:

-
To increase the gain, drag the slider to the right.
-
To decrease the gain, drag the slider to the left.
-
-
Repeat steps 1 and 2 to adjust the second track’s pan and gain.